| 일 | 월 | 화 | 수 | 목 | 금 | 토 |
|---|---|---|---|---|---|---|
| 1 | 2 | 3 | 4 | 5 | 6 | 7 |
| 8 | 9 | 10 | 11 | 12 | 13 | 14 |
| 15 | 16 | 17 | 18 | 19 | 20 | 21 |
| 22 | 23 | 24 | 25 | 26 | 27 | 28 |
| 29 | 30 |
Tags
- 순서대로방문하기
- PQ
- Calibration
- 마법의숲탐색
- 소프티어
- 코드트리빵
- 싸움땅
- 조합
- 포탑부수기
- 시뮬레이션
- DP
- 왕실의기사대결
- ARM
- 3Dreconstruction
- 슈퍼컴퓨터클러스터
- BFS
- 구현
- 이진탐색
- 코드트리
- 삼성기출
- 백준
- dfs
- DenseDepth
- ros
- 루돌프의반란
- ICER
- 수영대회결승전
- 마이크로프로세서
- 토끼와 경주
- 나무박멸
Archives
- Today
- Total
from palette import colorful_colors
[Computer Vision] Homography를 이용한 파노라마 만들기(python 코드 첨부) 본문
AI/Computer Vision
[Computer Vision] Homography를 이용한 파노라마 만들기(python 코드 첨부)
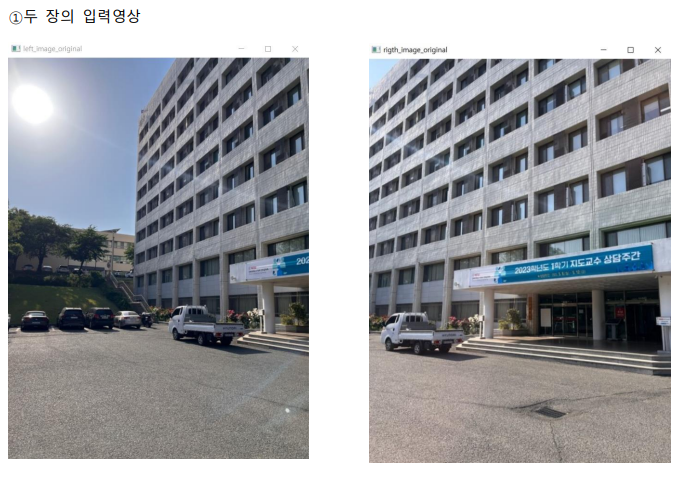
colorful-palette 2023. 5. 17. 11:00두 장의 이미지로 파노라마를 만드는 코드입니다. 특징점은 ORB로 잡고 opencv의 findHomography 함수를 이용해 파노라마를 만듭니다. (코드는 뒤쪽에 첨부!)
결과사진:


# -- coding: utf8 --
import cv2
import numpy as np
def warpImages(img1, img2, H):
rows1, cols1 = img1.shape[:2]
rows2, cols2 = img2.shape[:2]
temp_points = np.float32([[0, 0], [0, rows2], [cols2, rows2], [cols2, 0]]).reshape(-1, 1, 2)
list_of_points_2 = cv2.perspectiveTransform(temp_points, H)
list_of_points = np.concatenate((np.float32([[0, 0], [0, rows1], [cols1, rows1], [cols1, 0]]).reshape(-1, 1, 2), list_of_points_2), axis=0)
x_min, y_min = np.int32(list_of_points.min(axis=0).ravel() - 0.5)
x_max, y_max = np.int32(list_of_points.max(axis=0).ravel() + 0.5)
translation_dist = [-x_min, -y_min]
H_translation = np.array([[1, 0, translation_dist[0]], [0, 1, translation_dist[1]], [0, 0, 1]])
output_img = cv2.warpPerspective(img2, H_translation.dot(H), (x_max - x_min, y_max - y_min))
output_img[translation_dist[1]:rows1 + translation_dist[1], translation_dist[0]:cols1 + translation_dist[0]] = img1
return output_img
# 사진 읽어오기
img1 = '4-2.jpg'
img2 = '4-3.jpg'
img_left = cv2.imread(img1)
img_right = cv2.imread(img2)
h_left, w_left = img_left.shape[:2]
h_right, w_right = img_right.shape[:2]
cv2.imshow("left_image_original",img_left)
cv2.imshow("rigth_image_original",img_right)
# 보다 정확한 결과를 위해 gray scale로 변환
left_gray = cv2.cvtColor(img_left, cv2.COLOR_BGR2GRAY)
right_gray = cv2.cvtColor(img_right, cv2.COLOR_BGR2GRAY)
# SIFT descriptor 생성
descriptor = cv2.ORB_create()
kp_left, des_left = descriptor.detectAndCompute(img_left, None)
kp_right, des_right = descriptor.detectAndCompute(img_right, None)
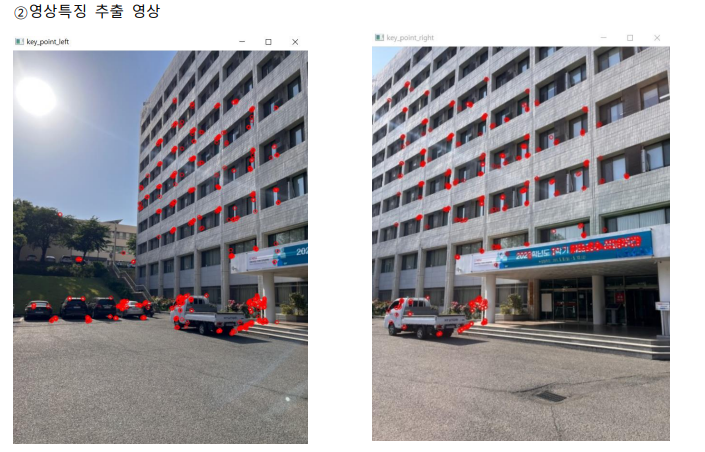
# 특징점 출력
cv2.imshow("key_point_left", cv2.drawKeypoints(img_left, kp_left, None, (0,0,255)))
cv2.imshow("key_point_right", cv2.drawKeypoints(img_right, kp_right, None, (0,0,255)))
# BFmatcher 객체 생성 및 knn 매칭 (두 이미지간에 특징 일치시키기)
#bf = cv2.BFMatcher(cv2.NORM_L2, crossCheck=True)
matcher = cv2.DescriptorMatcher_create("BruteForce")
matches = matcher.knnMatch(des_left, des_right, 2)
# 좋은 매칭점 선별
good_matches = []
for m,n in matches:
if m.distance < 0.7*n.distance:
good_matches.append(m)
# good_matches 시각화(매칭점 연결 전시)
img_good_matches = cv2.drawMatches(img_left, kp_left, img_right, kp_right, good_matches, None, flags=cv2.DrawMatchesFlags_NOT_DRAW_SINGLE_POINTS)
cv2.imshow("Good Matches", img_good_matches)
# 매칭점 좌표 변환
src_pts = np.float32([kp_left[m.queryIdx].pt for m in good_matches]).reshape(-1,1,2)
dst_pts = np.float32([kp_right[m.trainIdx].pt for m in good_matches]).reshape(-1,1,2)
# RANSAC 알고리즘을 이용한 변환 행렬 계산 - 두 이미지 변환 행렬 계산. 임계값은 5.0 이용.
M, mask = cv2.findHomography(src_pts, dst_pts, cv2.RANSAC, 5.0)
# 이미지 수평으로 붙이기
result = warpImages(img_right, img_left, M)
# 파노라마 이미지 출력
cv2.imshow("Panorama", result)
cv2.waitKey(0)
cv2.destroyAllWindows()
추가: 세 장의 이미지로 파노라마를 만드는 코드:
# -- coding: utf8 --
import cv2
import numpy as np

def warpImages(img1, img2, H):
    rows1, cols1 = img1.shape[:2]
    rows2, cols2 = img2.shape[:2]
    temp_points = np.float32([[0, 0], [0, rows2], [cols2, rows2], [cols2, 0]]).reshape(-1, 1, 2)

    list_of_points_2 = cv2.perspectiveTransform(temp_points, H)
    list_of_points = np.concatenate((np.float32([[0, 0], [0, rows1], [cols1, rows1], [cols1, 0]]).reshape(-1, 1, 2), list_of_points_2), axis=0)
    x_min, y_min = np.int32(list_of_points.min(axis=0).ravel() - 0.5)
    x_max, y_max = np.int32(list_of_points.max(axis=0).ravel() + 0.5)

    translation_dist = [-x_min, -y_min]
    H_translation = np.array([[1, 0, translation_dist[0]], [0, 1, translation_dist[1]], [0, 0, 1]])
    output_img = cv2.warpPerspective(img2, H_translation.dot(H), (x_max - x_min, y_max - y_min))
    output_img[translation_dist[1]:rows1 + translation_dist[1], translation_dist[0]:cols1 + translation_dist[0]] = img1
    return output_img

img_left = cv2.imread('1-1.jpg')
img_mid = cv2.imread('1-2.jpg')
img_right = cv2.imread('1-3.jpg')
cv2.imshow("left_image_original",img_left)
cv2.imshow("mid_image_original",img_mid)
cv2.imshow("right_image_original",img_right)

# 이미지를 gray scale로 변환
left_gray = cv2.cvtColor(img_left, cv2.COLOR_BGR2GRAY)
mid_gray = cv2.cvtColor(img_mid, cv2.COLOR_BGR2GRAY)

# SIFT descriptor 생성
descriptor = cv2.SIFT_create()
kp_left, des_left = descriptor.detectAndCompute(left_gray, None)
kp_mid, des_mid = descriptor.detectAndCompute(mid_gray, None)
cv2.imshow("key_point_left", cv2.drawKeypoints(img_left, kp_left, None, (0,0,255)))
cv2.imshow("key_point_mid", cv2.drawKeypoints(img_mid, kp_mid, None, (0,0,255)))
# BFMatcher 객체 생성 및 knn 매칭 (두 이미지간에 특징 일치시키기)
matcher = cv2.DescriptorMatcher_create("BruteForce")
matches1 = matcher.knnMatch(des_left, des_mid, 2)

# 좋은 매칭점 선별
good_matches1 = []
for m,n in matches1:
    if m.distance < 0.7*n.distance:
        good_matches1.append(m)

# good_matches 시각화(매칭점 연결 전시)
img_good_matches1 = cv2.drawMatches(img_left, kp_left, img_mid, kp_mid, good_matches1, None, flags=cv2.DrawMatchesFlags_NOT_DRAW_SINGLE_POINTS)
cv2.imshow("Good Matches_left+mid", img_good_matches1)


# 매칭점 좌표 변환
src_pts1 = np.float32([kp_left[m.queryIdx].pt for m in good_matches1]).reshape(-1,1,2)
dst_pts1 = np.float32([kp_mid[m.trainIdx].pt for m in good_matches1]).reshape(-1,1,2)

# RANSAC 알고리즘을 이용한 변환 행렬 계산 - 두 이미지 변환 행렬 계산. 임계값은 5.0 이용.
M1, mask1 = cv2.findHomography(src_pts1, dst_pts1, cv2.RANSAC, 5.0)
result1 = warpImages(img_mid, img_left, M1)
cv2.imshow("Merged Image_left+mid", result1)

# result1과 img_right 합치기
result1_gray = cv2.cvtColor(result1, cv2.COLOR_BGR2GRAY)
right_gray = cv2.cvtColor(img_right, cv2.COLOR_BGR2GRAY)
kp_result1, des_result1 = descriptor.detectAndCompute(result1_gray, None)
kp_right, des_right = descriptor.detectAndCompute(right_gray, None)
cv2.imshow("key_point_right", cv2.drawKeypoints(img_right, kp_right, None, (0,0,255)))


matches2 = matcher.knnMatch(des_result1, des_right, 2)
good_matches2 = []
for m,n in matches2:
    if m.distance < 0.7*n.distance:
        good_matches2.append(m)

img_good_matches2 = cv2.drawMatches(result1, kp_result1, img_right, kp_right, good_matches2, None, flags=cv2.DrawMatchesFlags_NOT_DRAW_SINGLE_POINTS)
cv2.imshow("Good Matches_result1+right", img_good_matches2)
src_pts2 = np.float32([kp_result1[m.queryIdx].pt for m in good_matches2]).reshape(-1,1,2)
dst_pts2 = np.float32([kp_right[m.trainIdx].pt for m in good_matches2]).reshape(-1,1,2)
M2, mask2 = cv2.findHomography(src_pts2, dst_pts2, cv2.RANSAC, 5.0)
final_merge = warpImages(img_right, result1,M2)

cv2.imshow("Merged Image_final", final_merge)
cv2.waitKey(0)
cv2.destroyAllWindows()
reference:
openCV.영상 붙이기
# Computer Vision # https://git.ajou.ac.kr/givemebro/cv_3.git # python==3.6.1 # cv2==4.4.0 # opencv-contrib-python==3.4.1.15 # 두 장의 영상을 붙여 한 개의 영상을 만듬 # 1. 특징점이 적지 않은 곳을 촬영하고, 카메라를 중심
broscoding.tistory.com
#005 How to create a panorama image using OpenCV with Python (datahacker.rs)
#005 How to create a panorama image using OpenCV with Python
Master Data Science - Datahacker. Here we have provided high-quality information for you to get started with data science ...
datahacker.rs
'AI > Computer Vision' 카테고리의 다른 글
| [Computer Vision] SGBM을 이용한 Disparity Map 구하기와 meshlab을 이용한 3D reconstruction (0) | 2023.06.22 |
|---|---|
| [Computer Vision] opencv를 이용해 templete matching 구현하기 (0) | 2023.05.06 |
| [Computer Vision] Calibration이란?, Intrinsic parameter, extrinsic parameter (0) | 2023.04.18 |
| [Computer Vision] Aperture(조리개), DoF(심도) (0) | 2023.03.20 |
| [Computer Vision] SLR, Pinhole(핀홀 카메라), Focal length(초점거리), 렌즈공식 (0) | 2023.03.20 |
'AI/Computer Vision' Related Articles
more


